
A gap beneath your garage door can let dust, insects, windblown debris, and moisture inside. If the weatherstripping is cracked, flattened, or pulling loose, replacing it may help restore contact between the door and the floor. But finding the right replacement takes more than knowing whether you have a single-car or double-car door.
Garage door bottom seal types differ in how they attach, their dimensions, and their sealing shape. Two products can look almost identical beneath a closed door yet fit completely different retainers.
This guide explains how to identify your existing seal, measure the features that matter, and check compatibility before ordering. For Las Vegas homeowners, a correctly fitted seal is a practical part of keeping the garage cleaner and better protected.
Quick Answer: How Do You Identify Your Bottom Seal?
Look at an accessible end of the seal and the holder securing it to the door. That holder is called a retainer. Identify whether the seal has T-shaped attachment edges, rounded beads, a molded bulb with an attachment stem, or direct fasteners.
Next, measure the attachment features, seal body, and required length. Compare those measurements with the replacement product’s cross-section drawing.
The profile and dimensions should match; a similar appearance or “universal” label alone does not confirm compatibility.
Know the Difference Between a Seal, Retainer, and Threshold
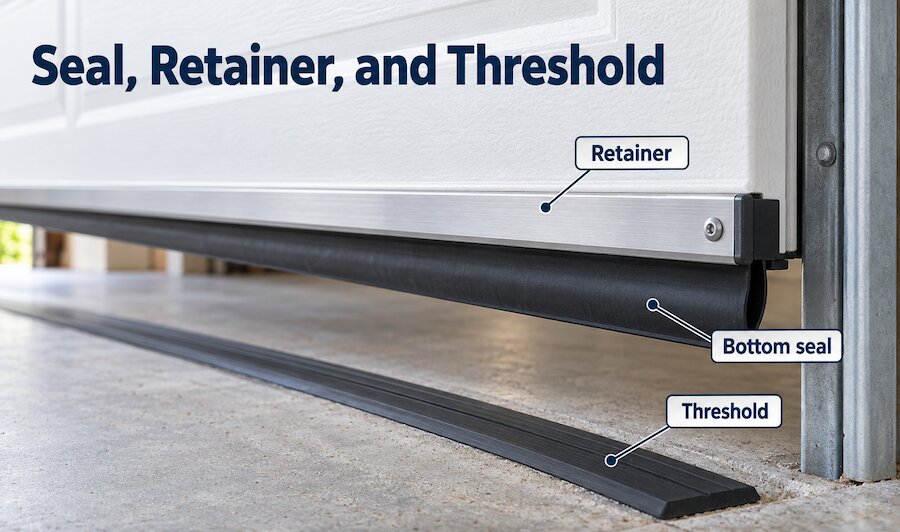
The bottom seal is the flexible weatherstripping attached to the door’s lower edge. It compresses against the floor when the door closes.
The retainer holds that seal in place. Many retainers have channels that accept a specific attachment profile. Others use a different mounting arrangement.
A threshold seal attaches to the garage floor rather than the door. It can supplement a bottom seal, but it is a separate component.
Knowing these differences helps you identify what needs replacing. If the flexible seal is damaged but the retainer remains usable, replacing only the seal may be sufficient. If the holder is bent or broken, it also needs attention.
Common Garage Door Bottom Seal Types
Product names can be confusing because they describe different features. “T-end” identifies an attachment profile, while “bulb” describes a sealing body. “Rubber” and “vinyl” describe materials.
Start with how the seal attaches.
T-End Seals
T-end seals have attachment edges shaped like small capital Ts. Those edges fit into matching retainer channels.
A common configuration uses a flexible strip with a T-shaped edge on each side. Once both edges are inserted, the strip forms a loop beneath the door.
Check the number of channels and measure the T-shaped attachment width. T-end seals come in different dimensions, so identifying the general style is only the first step.
Bead-End Seals
Bead-end seals use rounded attachment edges rather than T-shaped ones. The beads fit corresponding grooves in the retainer.
An installed bead-end seal can resemble a T-end seal because both may form a curved loop. The important difference is visible at the attachment edges.
Record the bead diameter and compare the complete cross-section with the replacement drawing. Do not assume a bead-end product fits simply because its overall width looks correct.
P-Bulb, T-Bulb, and Other Bulb Seals
Bulb seals have a hollow body that compresses against the floor. Their attachment features vary: some have a P-shaped profile, while others use a T-shaped connection or another design.
The word “bulb” does not establish compatibility. You need to identify the connection and measure the body according to the supplier’s specifications.
Also, distinguish a molded bulb from a flat strip that forms a loop after installation. They may look similar beneath the door but require different measurements.
Direct-Attached and Specialty Seals
Some seals fasten directly to the door instead of sliding into channels. Other doors use specialty profiles that do not match common replacement strips.
If yours has an unfamiliar shape or mounting arrangement, look for the door’s manufacturer and model. A model-specific parts drawing can help narrow the options.
How to Identify Your Existing Seal
Begin by locating the manufacturer’s label, often found on the inside of the door. Photograph the label and any model information.
Then inspect an accessible end of the retainer. Look for the attachment shape, channel arrangement, and condition of the holder. A clear end-view photograph is more useful than a picture of the seal pressed against the floor.
Position and secure the door according to its manufacturer’s instructions before close inspection. Keep hands clear of moving sections. Do not loosen bottom brackets, cables, or spring hardware to access the seal.
If the profile is hidden, avoid forcing tools into the retainer. A technician can help identify it without damaging the holder.
Finally, compare your photograph with a replacement drawing. Door brand is a useful clue, but the actual profile and dimensions provide stronger confirmation.
How to Measure Your Garage Door Bottom Seal
Gather a tape measure, a precise ruler or calipers, your phone, and a place to record measurements. Use consistent units and write down which feature each number represents.
Measure the Required Length
Measure across the bottom of the door where the replacement seal will sit. Record the actual distance rather than relying solely on the door’s advertised size.
The old seal can provide a reference, but it may have shrunk, stretched, or lost pieces. Its current length may not represent the length you need.
Follow the replacement manufacturer’s instructions for ordering allowance and trimming. Avoid cutting the new seal before confirming those directions.
Measure the Attachment Profile
For a T-end seal, measure the width across the top of the T. Record any other dimensions shown in the product drawing, such as stem thickness.
For a bead-end seal, measure the rounded bead’s diameter and compare its shape with the drawing.
For a P-bulb or specialty profile, measure the attachment features specified by the supplier. These may include the stem, head, or base.
A caliper helps with small dimensions. Measuring only the visible slot opening in the retainer may be insufficient because the attachment sits inside a larger channel.
Measure the Seal Body
For a flexible strip that forms a loop, replacement listings may specify its flat width. This is the edge-to-edge width of the uncurled strip, rather than the height of the installed loop.
If a sample is available, lay it flat without stretching it. Use an undamaged section whenever possible.
For a molded bulb, record the body dimensions shown in the replacement drawing. Measure it without squeezing it.
If the old seal is badly flattened or brittle, treat its body measurements cautiously and use the manufacturer’s specifications to confirm the size.
Check Floor Contact Across the Door
With the door closed, inspect contact at the left, center, and right. Note where daylight appears and whether the seal touches the floor evenly.
An uneven gap can involve worn weatherstripping, floor irregularities, or a door problem. A larger seal may help in some situations, but excessive bulk can interfere with closing.
Do not increase opener force to push an oversized seal against the floor. Have persistent gaps or operating problems evaluated.
What If the Old Seal Is Missing?
Start with the retainer. Photograph its end profile and record accessible dimensions, along with the door’s manufacturer and model.
Share that information with the supplier or a garage door technician. Without an old seal, confirming the retainer profile becomes especially important.
If the retainer is damaged or a compatible insert is unavailable, a replacement seal-and-retainer kit may be an option. The kit still needs to suit the door’s construction and mounting arrangement.
Choose the Material After Confirming Fit
Once you have identified a compatible profile, compare material specifications.
Rubber, vinyl, and other compounds vary in flexibility, temperature tolerance, and resistance to weathering. Product quality matters, so broad material labels do not tell the whole story.
Clean away debris that could affect contact or insertion. Use cleaners and installation lubricants approved for the product rather than assuming any spray is suitable.

Common Mistakes That Lead to the Wrong Seal
Several avoidable mistakes cause replacement problems:
- Buying by door width alone: Length does not establish attachment compatibility.
- Identifying the installed loop as the attachment type: Inspect the edges entering the retainer.
- Assuming all T-end seals share one size: Measure the attachment dimensions.
- Using a distorted sample: Stretched or flattened material can produce misleading measurements.
- Trusting “universal” without checking: A kit may include its own retainer rather than fit yours.
- Choosing the thickest seal available: Correct compression and normal door operation matter.
Before ordering, confirm the profile, attachment dimensions, body size, required length, and retainer condition.
Get Help Identifying the Right Bottom Seal
The most reliable approach is straightforward: identify the attachment profile, measure the connection and sealing body, and confirm the required length. Keep an end-view photo with your measurements so you can compare replacements accurately.
If you are unsure which profile fits—or your door still leaves a gap—contact Precision Overhead Door of Las Vegas. Our team provides garage door repair and maintenance services and can help assess the next step. Call (702) 637-2700 to schedule an appointment.